Picture this: You have $200 worth of Ethereum sitting in your wallet. You see a new opportunity launching on Solana—maybe a new Real World Asset (RWA) platform or a high-yield staking pool. You go to move your ETH, and your wallet hits you with the reality check: “Estimated Gas Fee: $45.”
You are trapped. Paying 25% of your capital just to move it is financial madness.
I’m Julian Vance, the security and technical analyst here at CoinProfit101. In 2026, the crypto world is multi-chain. The days of being stuck on one expensive network are over. But moving between them—”bridging”—is the most dangerous and confusing action for a beginner.
Today, I’m going to show you how to escape Ethereum’s high fees and move your assets to Solana for under $3, in less than a minute, without getting scammed.
The Bridging Reality in 2026:
While Ethereum L1 gas fees remain high during peak hours ($20+), cross-chain bridge technology has evolved. New “Intent-Based” bridges and “Liquidity Networks” have driven the cost of moving capital down by over 90% compared to 2024.
The Problem: Why Can’t I Just Send It?
New users often ask, “Why can’t I just send ETH to my Solana address?”
Think of Ethereum and Solana as two totally different countries with different languages and banking systems.
- Ethereum speaks “EVM” (Ethereum Virtual Machine) and uses ETH for gas.
- Solana speaks “Rust” and uses SOL for gas.
If you send ETH directly to a Solana wallet address, it’s like trying to deposit Japanese Yen into a vending machine in New York. It won’t work, and your money will be stuck in limbo—forever.
To move value between them, you need a Bridge. A bridge is a protocol that takes your money on one chain, locks it in a vault, and then mints an equivalent amount of tokens on the other chain.
The “Old Way” vs. The “New Way”
Before we get to the tools, you need to understand the two main methods of moving funds.
The “Old Way” (Centralized Exchange Route)
This is what most beginners do because it feels “safe.”
- Send your ETH from your Ledger to Coinbase (Pay an ETH gas fee: ~$15).
- Sell your ETH for USD on Coinbase (Pay a trading fee: ~1% + create a taxable event).
- Buy SOL with that USD (Pay another trading fee: ~1%).
- Withdraw SOL to your Phantom wallet.
Verdict: Slow, expensive, and it creates a paperwork nightmare for your crypto taxes.
The “New Way” (Decentralized Bridge)
This is the pro method. You connect your wallets to a bridge protocol, approve the transaction, and the funds arrive on the other side in seconds.
- No KYC.
- No taxable sale (usually, as you are just moving assets, not selling them).
- Much faster and cheaper.
Top 3 Bridges Ranked (The Benchmark)
I have tested dozens of bridges. Many are slow, expensive, or have questionable security histories. These three are the current industry leaders for the ETH-to-SOL route.
| Bridge Name | Type | Best For | Avg. Cost & Time |
|---|---|---|---|
| Orbiter Finance | Liquidity Network | Speed & Small Amounts. Great for moving from ETH L2s (like Base/Arbitrum) to Solana. | ~$2.50 / 30 seconds |
| Portal (Wormhole) | Lock-and-Mint | Large Transfers & Safety. Wormhole is one of the most battle-tested protocols in crypto. | ~$5.00 / 2-5 minutes |
| Mayan Finance | Intent-Based / Swap | Convenience. It can swap tokens during the bridge (e.g., send ETH, receive SOL). | ~$3.00 / 1 minute |
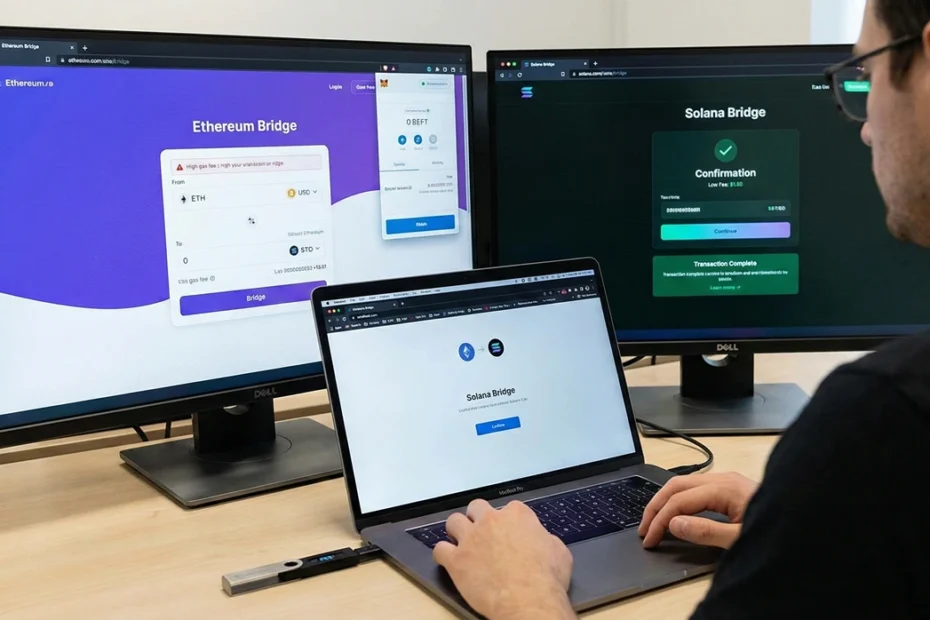
Step-by-Step Tutorial: Bridging with Mayan Finance
I’m choosing Mayan Finance for this tutorial because it’s the most user-friendly for beginners. It handles the “swap” for you, so you don’t end up with useless “Wrapped ETH” on Solana.
Prerequisites:
- An Ethereum wallet (like MetaMask) with some ETH for gas and the asset you want to bridge (e.g., USDC).
- A Solana wallet (like Phantom) to receive the funds.
Step 1: Go to the Official Site & Connect
Navigate to mayan.finance. Never search on Google; use official links to avoid phishing sites. Click “Connect Wallet” and connect both your Source wallet (Ethereum) and your Destination wallet (Solana).
Step 2: Select Your Route
- From Network: Ethereum
- To Network: Solana
- You Send: Select the token you have (e.g., USDC). Enter the amount (e.g., 100).
- You Receive: Select the token you want on Solana.Julian’s Tip: I highly recommend choosing USDC or SOL. Do not choose ETH, or you will get “Wrapped ETH” on Solana, which is annoying to use.
Step 3: Review the Quote
Mayan will find the best route. Look at the “Estimated Output.” It should show you receiving something like $97-$98 worth of SOL for your $100 USDC. The difference is the bridge fee and price impact. If the fee looks insanely high ($20+), stop. Ethereum network congestion might be spiking.
Step 4: Approve & Bridge
Click “Swap.” Your Ethereum wallet will pop up asking you to “Approve” the spending of your USDC.
Security Note: This is a standard permission, but always double-check the contract address. After the approval, sign the final transaction to initiate the bridge.
Step 5: Wait for Finality
The transaction will take about 1-2 minutes. The funds have to be locked on Ethereum, verified by the bridge network, and then released on Solana. You can track the progress on the Mayan dashboard. Once complete, open your Phantom wallet, and your new funds should be there.
Julian’s Security Briefing: The “Bridge of Death”
Bridging is a superpower in the 2026 crypto landscape, but it requires paranoia. Here is the risk analysis.
The Upside (Why Bridge?)
- Speed: Moves assets in 60 seconds vs. 3 days for a bank transfer.
- Privacy: No KYC required. No passport scans. Just wallet-to-wallet.
- Efficiency: Avoids the “Double Fee” of selling to USD on Coinbase and buying back.
The Top 3 Dangers
- The Phishing Link: Attackers buy Google Ads for keywords like “Orbiter Bridge.” You click the top link, it looks identical to the real site, and it drains your wallet. ALWAYS triple-check the URL.
- The “Infinite Approval” Trap: If a bridge contract gets hacked, attackers can use old approvals to steal funds. This is why you must revoke allowances regularly.
- The Liquidity Crisis: Sometimes, a bridge runs out of funds on the destination side. Your funds get stuck for hours until liquidity is rebalanced.
The Golden Rule of Bridging:
Always send a test amount first. If you plan to move $10,000, move $20 first. Yes, you pay double gas fees. Consider it a $20 insurance policy against losing $10,000. Never send your whole stack in one click on a new bridge.
FAQ: Common Bridging Problems
Frequently Asked Questions
Julian’s Final Verdict
Bridging is a superpower in the 2026 crypto landscape. It lets you chase yields, buy RWAs, and use the fastest networks without being beholden to centralized exchanges. But with great power comes great responsibility.
Use the trusted tools I’ve listed, bookmark the official URLs, always send a test transaction, and for the love of crypto, keep your hardware wallet connected to approve every step. Stay safe out there.

Julian Vance is a blockchain security researcher with a focus on cold storage protocols and decentralized network integrity. At CoinProfit101.com, Julian specializes in translating complex technical security concepts into plain English for everyday investors. Driven by the philosophy of “Don’t Trust, Verify,” he provides in-depth research into wallet vulnerabilities, phishing prevention, and the evolving landscape of digital asset custody. Julian’s goal is to ensure that every reader has the knowledge to be their own bank safely in the 2026 crypto environment.